From Zero to Million‑Dollar Renovation: The Untold Story

Ever looked at a vine‑choked fixer‑upper and caught yourself wondering, “Could I really turn that wreck into my dream home?”
Stick around, because by the end of this read you’ll walk away with the budget shortcuts, sweat‑saving hacks, and step‑by‑step timeline that turned one family’s derelict disaster into a million‑dollar masterpiece.

Meet the Dreamers
Emily and David Roman were ordinary weekend warriors with an extraordinary appetite for risk. When a 1920s craftsman—boarded‑up windows, collapsing porch, $180,000 price tag—popped onto the foreclosure list, they pounced. Friends called it “the money pit.” Emily called it “potential.” What they lacked in cash, they made up for in curiosity and late‑night YouTube marathons on plumbing, framing, and tile work.
Helpful takeaway: Buy the ugliest house in the best block. You’ll pay less up front and build equity the moment curb appeal improves.
Phase 1 – Vision & Game Plan
Before swinging a single hammer, the Romans sketched a room‑by‑room wishlist and assigned every line item to DIY, Professional, or Maybe Later. This matrix kept scope creep at bay and told contractors exactly where their expertise—and billable hours—were needed.
| Task | DIY | Pro |
|---|---|---|
| Demolition | ✅ | |
| Structural beam replacement | ✅ | |
| Cabinet installation | ✅ | |
| Electrical re‑wire | ✅ |
Hack: The “Pinterest Punch List”
They pinned 50+ inspiration photos, then reverse‑engineered each one to a materials list. If a fixture or finish didn’t appear in at least three mood‑board pics, it was cut. Result: design cohesion and fewer impulse buys.
Phase 2 – Budgeting Brilliance
Most first‑time flippers blow the bank on shiny finishes up front. The Romans flipped the script:
- 50 % Structural & Systems – Roof, foundation, electrical, HVAC.
- 25 % Interior Finishes – Flooring, cabinetry, paint.
- 10 % Exterior & Landscaping – Curb appeal that sells.
- 15 % Contingency – For the inevitable “uh‑oh” moments.
That 15 % safety net saved the project twice: first when they discovered asbestos insulation, then again when lumber prices spiked mid‑build.
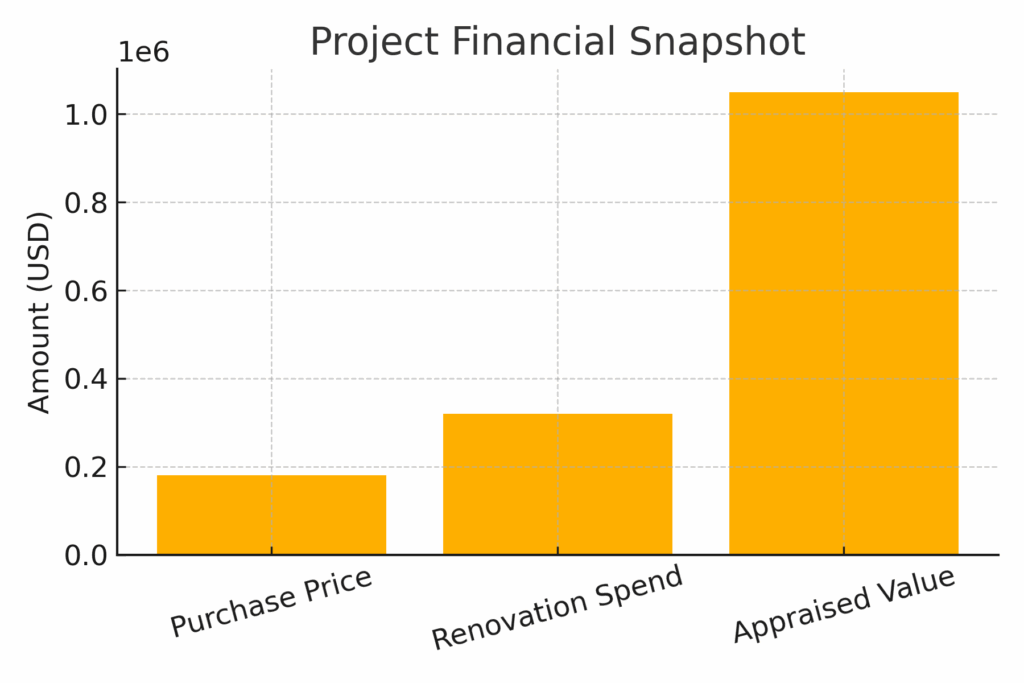
(See the bar chart below for their final spend vs. payoff.)
Money‑Saver: Supplier “Overruns”
Instead of buying full‑price tile, Emily called local wholesalers every Friday asking for overruns—leftover boxes from large commercial orders. She scored Italian marble subway tile at 60 % off.
Phase 3 – Demo Day & Curveballs
Nothing bonds a neighborhood like free pizza and a sledgehammer. Twelve friends helped gut the interior in a single, dusty Saturday. Hidden behind the plaster:
- Galvanized pipes turned to powder—full plumbing replacement required.
- Sagging joists under the kitchen—sistered with LVL beams.
- A vintage newspaper from 1942—framed and now hanging in the foyer.
Curveballs hurt less when you expect them. Every time a problem popped up, they paused work, updated the budget spreadsheet, and re‑ranked priorities.
Phase 4 – Sweat‑Equity Superheroes
For six straight months, the Romans clocked out of their 9‑to‑5s and clocked into the reno at 6 p.m. Weekends were marathons of:
- Floor sanding & staining (renting a sander cost a tenth of hiring out).
- Cabinet assembly parties (IKEA hacks with upgraded doors).
- Painting every surface—a single color family made trims and walls flow.
Time‑Saver: The “Two‑Tool Rule”
They limited themselves to two active tools each evening (say, a brad nailer and a miter saw). Fewer tools out meant quicker setup, safer work zones, and virtually zero lost sockets.
Phase 5 – Smart Splurges
Strategic splurges elevate a project from “good” to “jaw‑dropping.” The Romans chose three:
- Professional custom range hood—the kitchen’s statement piece.
- Oversized fiberglass windows—flooding light into the once‑dark living room.
- Native‑plant landscaping—low maintenance and instant curb pop.
Everything else stayed value‑driven—luxury‑look laminate over hardwood in secondary bedrooms, and stock vanities dressed up with DIY concrete counters.
The Payoff
Twenty‑two months after closing, the home appraised at $1,050,000. Subtract the purchase price ($180 k) and renovation spend ($320 k) and the Romans unlocked $550,000 in equity—without selling.
| Milestone | Cost / Value |
|---|---|
| Purchase Price | $180 k |
| Total Renovation Spend | $320 k |
| Final Appraised Value | $1.05 M |
Imagine paying a traditional down payment and earning half a million in sweat equity two years later.
Lessons You Can Use This Weekend
- Start with structure. Pretty finishes on a weak foundation are lipstick on a pig.
- Budget 15 % for surprises. You’ll either need it or celebrate the leftovers.
- DIY where sweat, not code, rules. Paint is forgiving; electrical fires aren’t.
- Plan your splurges. One “wow” feature per space beats scattered upgrades.
- Track everything. A shared Google Sheet kept the Romans and their trades aligned.
Ready to Begin?
Your fixer‑upper fantasy doesn’t require a TV crew or million‑dollar bankroll—just a plan, a budget, and the willingness to learn. Bookmark this story, print the budget chart, and let the Romans’ journey light your way from crumbling cottage to dream home.
Your future self will thank you every time you cross that freshly laid threshold.